



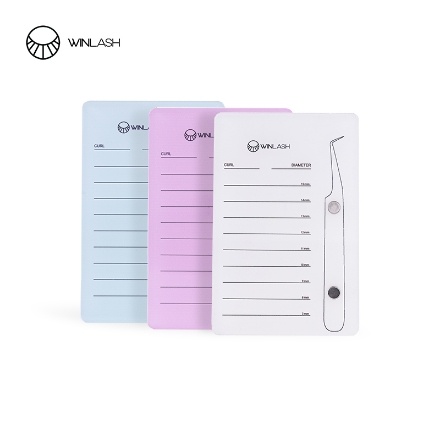


The choice is practical rather than complicated: choose the numbered acrylic tile when your main priority is sorting strips by length; consider the magnetic model when you want lash arrangement, adhesive placement and magnetic tweezer storage in one workspace. This gives lash artists a straightforward starting option and a more integrated workflow upgrade without suggesting that one design suits every technician.
Choose the Right Lash Tile for Your Lash Setup
The main difference between the WinLash options is how much workstation organisation each design provides. Both are intended to keep lash strips accessible, while the magnetic model adds dedicated places for adhesive and tweezers.
Acrylic Lash Tile Organizer with 7–15 mm Length Markings
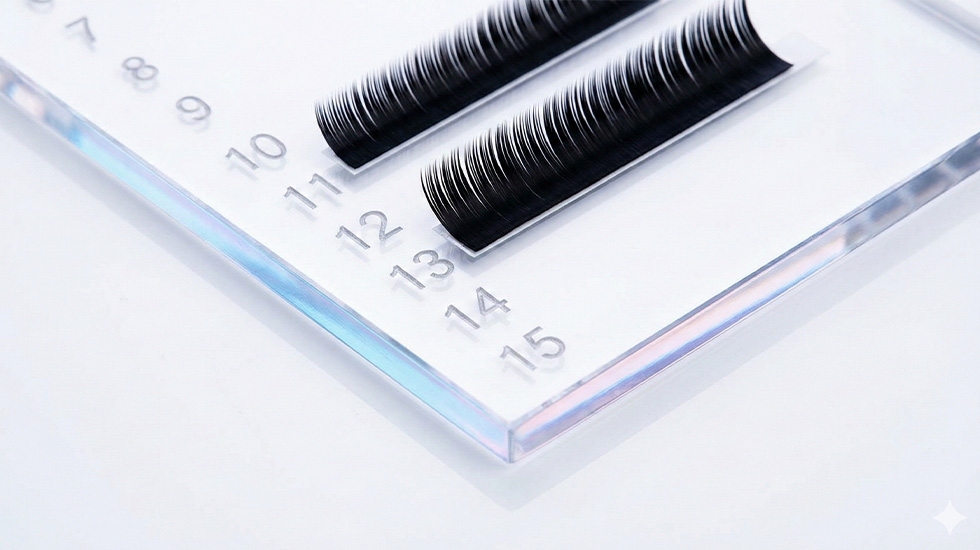
The Acrylic Lash Tile Organizer 7–15 mm (SKU 13010001) is made from high-quality plexiglass and has length indicators covering 7 mm to 15 mm. Its compact, portable design gives technicians a simple way to arrange lash strips by length and identify the section they need during a set. It is the more straightforward option for artists who want a clear, length-marked lash palette without additional tool-holding features.
Magnetic Double-Layer Lash Tile with Glue and Tweezer Holders
The Magnetic Double Layer Lash Tile with Glue Holder and Tweezers Magnet combines a double-layer construction with a dedicated glue placement area and a magnetic section that holds tweezers in place. Its length-segmented layout also gives lash strips an organised place on the workstation. The distinguishing feature is the combination: lash organisation, adhesive placement and magnetic tweezer parking in one tile.
For technicians who are ready to move beyond a basic strip organiser, this integrated layout is the workflow-led upgrade in the WinLash range. It brings several frequently used workstation functions together, while the acrylic model remains a simple option for length-based organisation.
| Feature | Acrylic Lash Tile Organizer | Magnetic Double-Layer Lash Tile |
|---|---|---|
| Main purpose | Organising lash strips by length | Organising lash strips and workstation tools |
| Length organisation | 7–15 mm indicators | Length-segmented lash arrangement |
| Workstation features | Compact, portable acrylic surface | Dedicated glue area and magnetic tweezer holder |
| Construction / care information | High-quality plexiglass | Double-layer design; listed as washable and easy to clean |
| Listed product-page price at review | AED 4.50 | AED 9.50 |
Organise Lash Strips for Easier Eyelash Extension Application
A lash tile works as a lash strip organiser during the appointment. Setting out strips before application makes the lengths easier to identify and keeps the working area more orderly. The exact layout depends on the tile design and the technician’s preferred lash mapping routine.
Arrange Lash Strips by Length for Quick Access
On the acrylic organiser, use the 7–15 mm indicators to place strips in their corresponding sections. On the magnetic tile, use the length-segmented layout to keep the selected strips in order. Arrange the lengths in the sequence required for the set you are creating, rather than mixing different lengths in one area.
Keep Tweezers and Adhesive Within Reach
The magnetic tile is designed for technicians who prefer a more integrated workstation. Place adhesive in the dedicated glue area and use the magnetic holder for the tweezers when they are not in hand. This keeps those items in designated positions instead of spreading them across the treatment surface. Always use the adhesive according to its own product instructions.
How to Clean and Store Your Lash Tile
Cleaning and storage should follow the tile material and the manufacturer’s instructions. The magnetic model is listed as washable and easy to clean, but the available product information does not specify a universal disinfectant, dilution or contact time for every tile. Do not assume that a chemical suitable for one surface is suitable for another.
Follow Material-Specific Cleaning Instructions
Remove visible lash and adhesive residue, then clean and disinfect reusable tools using products and contact times approved for the item and the disinfectant label. As one example of professional sanitation requirements, Utah’s cosmetology facility sanitation rule specifically includes eyelash stands, holders, pallets and trays among the items that must be cleaned and disinfected before service; glue pallets and holders must be single-client disposable or cleaned and disinfected before the next client. This is a Utah reference, not a statement of UAE law, so follow the applicable local requirements and the manufacturer's care instructions.
Store Your Lash Tile and Protect Lash Strips Between Appointments
After cleaning, allow the tile to dry fully before storing it in a clean place. Keep unused lash extensions in their original packaging or another clean, closed container, and avoid returning used or exposed strips to the original tray. Prepare only the strips needed for the appointment and keep the work surface free from dust and product residue.
Frequently Asked Questions About Lash Tiles
How much does a lash tile cost?
At the time of review, the dedicated WinLash product pages list the Acrylic Lash Tile Organizer 7–15 mm at AED 4.50 and the Magnetic Double-Layer Lash Tile at AED 9.50. Prices and availability can change, so check the live product listing before ordering.
What is the difference between a lash tile and lash trays?
A lash tile is a workstation surface used to arrange extension strips during application. Lash trays are the packages that hold the extension strips as supplied. In simple terms, the tray stores and presents the lashes, while the tile provides a separate working surface for organising the strips during a service.
Build a workstation that fits the way you lash. Start with a length-marked acrylic organiser for straightforward strip sorting, or choose the magnetic double-layer design when you want glue placement and tweezer storage built into the same setup. Explore the professional tools and supplies at WinLash Dubai to complete your lash workstation.