


quick access
- Why Isolation Tweezers Matter for Lash Extensions
- Key Benefits of Isolation Tweezers
- Curved vs Straight Isolation Tweezers
- Best Curved Isolation Tweezers for Volume Lashes
- Best Straight Isolation Tweezers for Precision Work
- How to Use Isolation Tweezers Step-by-Step
- How to Grip Isolation Tweezers Properly
- Pro Tips for Lash Isolation Techniques
- How to Disinfect Tweezers at Home
- Storage Tips for Isolation Tweezers
- When to Replace Your Isolation Tweezers
- Best Isolation Tweezers: Top Features and Picks
- Alternatives to Isolation Tweezers for Lashes
- Can Tweezers Go in Carry-On Luggage?
- Isolation Tweezers Guide: Key Takeaways
- Frequently Asked Questions about Isolation Tweezers
In the ever-evolving world of eyelash extensions, isolation tweezers stand out as essential tools that empower lash artists to deliver precise, salon-quality results every time. Specially designed for lash technicians in demanding climates like the UAE, where high humidity and intense heat can affect tool reliability, this in-depth guide explores everything from different types and expert usage techniques to maintenance essentials and smart buying tips. Whether you're a beginner honing your craft or a pro refining your skills, discover how the right isolation tweezers can help you sidestep common pitfalls, boost lash retention, and create breathtaking, durable sets that thrive in any environment. Ready to elevate your toolkit? Explore our premium collection of isolation tweezers at Winlash Tweezers and Scissors for options tailored to your needs.
Why Isolation Tweezers Matter for Lash Extensions
Isolation tweezers are precision-engineered devices tailored for separating individual natural lashes during eyelash extension procedures. What sets them apart from standard tweezers is their ultra-fine tips and balanced construction, which allow for delicate manipulation without causing damage or clumping. In regions like Dubai, where humidity often exceeds 80% and temperatures soar, these tools help counteract the stickiness caused by natural oils and sweat, ensuring clean separations that lead to more uniform and durable applications.
Beyond basic functionality, effective use of isolation tweezers directly influences lash retention. By isolating lashes properly, you minimize the risk of extensions bonding to multiple naturals, which can lead to premature shedding or uneven growth cycles. Industry observations indicate that mastering this step can enhance lash longevity by 20-30%, as it promotes stronger adhesive bonds and reduces stress on the natural lashes. For lash artists handling diverse client needs—from subtle classics to bold volumes—these tweezers become indispensable for delivering results that withstand daily activities in a humid climate.
From Beginner to Pro: Key Benefits of Isolation Tweezers
If you're just starting out in lash artistry, isolation tweezers act as a reliable bridge to building confidence, offering the control needed to practice separation without overwhelming complexity. They help beginners spot and correct issues like overlapping lashes early on, turning potential frustrations into learning opportunities. As you advance to professional levels, the ergonomic features of these tools—such as lightweight handles and calibrated tension—become crucial for sustaining productivity during back-to-back appointments, especially in warm salon settings where hand fatigue can set in quickly.
In the UAE's vibrant beauty market, where clients often seek resilient looks for events amid coastal humidity, opting for rust-resistant isolation tweezers ensures tools remain sharp and hygienic over time. This not only streamlines workflows but also elevates client trust, as well-maintained equipment signals a commitment to quality. Whether you're refining techniques for volume fans or hybrid styles, these benefits translate to fewer touch-ups, happier repeat customers, and a more efficient practice overall.
Curved vs Straight Isolation Tweezers: Which to Choose?

Deciding between curved and straight isolation tweezers hinges on your preferred application style and the specific demands of your lash work. Curved isolation tweezers, averaging around 105 monthly searches, are particularly favored for volume extensions due to their angled design that enhances visibility and reach. Straight versions, on the other hand, provide unwavering stability for classic one-to-one placements, allowing for meticulous control near the lash line.
| Type | Best For | Pros | Cons | Avg Search Volume |
|---|---|---|---|---|
| Curved | Volume lashes | Ergonomic angle, reduced strain | Learning curve for precision | 105 |
| Straight | Classic lashes | Direct control, accuracy | May cause wrist fatigue | Varies (bundled in searches like 40 for "best isolation tweezers") |
Best Curved Isolation Tweezers for Volume Lashes
Curved isolation tweezers excel in scenarios requiring an elevated approach, such as when building multi-fiber fans for volume effects. Their subtle bend aligns with natural hand movements, minimizing wrist twists and allowing for extended use without discomfort. In humid locales like the UAE, models with matte or textured finishes prevent slippage from perspiration, making them reliable for intricate work. Lash professionals often recommend starting with a 45-degree curve for versatility, as it balances reach and precision, helping you isolate even the finest baby lashes effectively.
Best Straight Isolation Tweezers for Precision Work
Straight isolation tweezers shine in tasks demanding pinpoint accuracy, like isolating lashes close to the root in classic extensions. Their linear design offers firm stability, enabling you to navigate dense lash lines with confidence. For artists in coastal areas prone to salt-laden air, stainless steel variants with anti-corrosion coatings maintain their edge longer. Experimenting with different tip widths can fine-tune your technique, ensuring these tools adapt to various lash densities and client preferences for seamless results.
How to Use Isolation Tweezers Step-by-Step
Getting started with isolation tweezers involves thoughtful setup to maximize safety and efficiency. Begin by securing the client's lower lashes with gentle tape and applying a primer to the upper ones, which helps cut through oils amplified by humidity. A well-lit workspace is essential, particularly in Dubai's mix of natural sunlight and artificial lighting, to spot subtle lash distinctions clearly.
- Grasp the tweezers comfortably, positioning them like an extension of your fingers for optimal control.
- Carefully part a single natural lash, using light pressure to hold neighboring ones at bay without pulling.
- Coordinate with your volume or pickup tweezers to attach the extension swiftly, ensuring the bond sets properly.
- Finish by softly brushing through the lashes to detect and correct any adhesions, promoting a flawless finish.
How to Grip Isolation Tweezers Properly

Mastering the correct grip on your tweezers is essential for precision, comfort, and preventing hand strain during lash extension sessions. The most common technique is the tripod grip, where you position your thumb and index finger on the handles to anchor the tool, while your middle finger rests underneath for added stability and even pressure distribution. This method helps avoid cramps and allows for finer control, especially over longer periods. Many artists recommend holding the tweezers like a pencil in your non-dominant hand, keeping your wrist relaxed and straight to minimize fatigue—think of it as an extension of your arm rather than a forceful clamp.
In warmer or humid climates, where sweat can cause slippage, take breaks to wipe your hands and the handles with a soft microfiber cloth to maintain traction. Common mistakes to avoid include gripping too tightly with just your thumb and index finger, which can lead to uneven pressure and accidental lash damage, or squeezing the tool excessively, which reduces sensitivity. Start practicing on a mannequin head to develop muscle memory, experimenting with slight adjustments for curved versus straight designs until the hold feels intuitive. With consistent practice, this foundation will improve your overall efficiency and result in smoother, more professional applications.
Pro Tips for Lash Isolation Techniques
Elevating your isolation skills can turn everyday lash work into seamless artistry, leading to better retention and client satisfaction. For curved tweezers, approach the lashes at a slight angle to gently lift and separate them without tugging; with straight ones, use a straightforward forward motion for maximum accuracy near the base. In high-humidity environments, speed up adhesive curing with a quick mist from a nano-mister or a gentle fan after placement to secure the bonds quickly. Always focus on gentle, deliberate movements to prevent discomfort—slide the tips as close to the eyelid as possible without touching the skin, isolating just one natural lash at a time to avoid clumping.
To streamline the process, try layering your work by starting from the outer corners and moving inward for balanced coverage, or incorporate taping methods like the "tape-up" technique to section off layers of lashes for easier access. Beginners might benefit from using their fingers alongside tweezers to feel the lash placement more tactilely, while pros can remove minor imperfections as they go by brushing through the set periodically. Other helpful strategies include using gel pads under the eyes for better visibility and opting for the right adhesive consistency to prevent sticking. By incorporating these approaches, you'll not only accelerate your workflow but also achieve more natural, durable extensions that hold up well in daily wear.
How to Disinfect Tweezers at Home
Keeping your beauty tools hygienic is crucial for safe practices and preventing infections, and disinfecting them at home doesn't require fancy equipment if done correctly. Begin by washing your hands thoroughly, then rinse the tweezers under warm, soapy water to remove any visible residue like adhesive or debris—use a mild antibacterial soap for best results. Next, sanitize by dipping the tips (or the entire tool if possible) in 70-90% isopropyl alcohol or hydrogen peroxide for at least 10-30 minutes to kill bacteria effectively; for a deeper clean, you can boil them in water for 5-15 minutes or soak in a salon-approved solution like barbicide, which won't damage the metal if used as directed.
If you prefer alternatives, wipe with a cotton pad soaked in alcohol and let it sit for a minute, or consider UV sterilizers for non-contact disinfection. Always air-dry completely on a clean surface or paper towel to avoid rust, and in moist settings, pat dry with a lint-free cloth to speed things up. Remember to avoid harsh chemicals that could corrode the tips, and make this a routine after every use or at the end of the day. Proper disinfection not only extends tool life but also ensures a professional, trustworthy service for your clients.
Storage Tips for Isolation Tweezers
Effective storage habits can significantly prolong the lifespan of your tools by protecting them from damage, dust, and environmental factors. Opt for dedicated cases, pouches, or acrylic stands with protective tip guards to keep the points sharp and prevent bending—store them with tips facing upward to avoid pressure on the delicate edges. In humid regions, include silica gel packets in your storage drawer or container to absorb moisture and ward off corrosion or mold buildup. For organization, consider a tweezer holder or display stand that keeps multiple pairs separated and easily accessible, reducing the risk of scratches from contact with other items.
Always ensure the tweezers are fully dry before storing to prevent bacterial growth, and keep them in a clean, dedicated spot away from high-traffic areas or used supplies. Silicone mats or sterile containers can add an extra layer of security by preventing slippage during storage. By following these simple practices, you'll maintain the precision and reliability of your tools, making your daily routine more efficient and hassle-free.
When to Replace Your Isolation Tweezers

Recognizing the right time to update your tools helps maintain high-quality work and avoids issues like uneven applications or lash damage. Key indicators include dulled or misaligned tips that make it hard to grip individual lashes finely, visible bends in the shaft from drops, or rust spots that develop faster in salty or humid air. If the tension feels loose—causing slips or inconsistent holds—or you notice light passing through the closed tips, performance is likely compromised. Other signs are increased difficulty in pickup, fans that fall apart easily, or even natural lashes breaking during use, which could stem from worn edges.
For regular users, aim to replace them every 6-18 months depending on frequency and care, but inspect monthly by closing the tips against light or testing grip on a practice strip. Timely replacement ensures consistent tension and alignment, leading to better retention and fewer frustrations. Investing in a new pair when needed not only safeguards your clients' lashes but also keeps your techniques sharp and professional.
Best Isolation Tweezers: Top Features and Picks
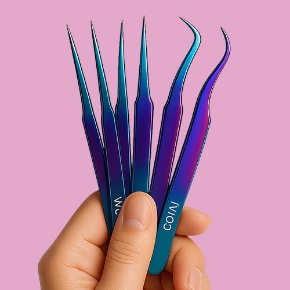
Selecting the right isolation tweezers can transform your lash extension workflow, delivering flawless results with less effort and greater precision. As a lash artist, focus on tools that combine durability, comfort, and reliability to handle daily demands, especially in humid environments like the UAE where moisture can challenge tool performance. Key features to seek include high-quality stainless steel construction for long-lasting strength and resistance to corrosion, ultra-sharp tips for effortless lash separation, and ergonomic designs that minimize hand strain during extended sessions. Anti-slip grips and balanced weight distribution are also essential, ensuring steady control whether you're working on classic or volume applications.
To help you find the perfect match, we've curated a selection of standout isolation tweezers from Winlash, each crafted with professional-grade materials and thoughtful engineering. These picks cater to various techniques and preferences, making it easy to upgrade your kit today:
- Straight Lash Tweezer Isolation W8: Ideal for precise classic lash work, this straight model offers exceptional stability and fine-point accuracy for isolating even the most stubborn lashes. Its lightweight build and non-slip handle make it a go-to for beginners and pros alike. Shop Now
- Dolphin Curved Lash Tweezer Isolation W9: With a gentle curve for enhanced visibility, this tweezer excels in volume fan creation, allowing smooth access to inner corners without wrist fatigue. The rust-resistant finish holds up well in high-humidity settings, ensuring consistent performance. Shop Now
- Dolphin Curved Lash Tweezer Isolation: A versatile curved option that's perfect for hybrid styles, featuring razor-thin tips and a comfortable grip that promotes all-day use. It's designed to prevent lash clumping, helping you achieve natural, voluminous looks effortlessly. Shop Now
- Eyelash Tweezers Set (2-Pcs Volume & Isolation with Metal Case): This convenient duo pairs a volume tweezer with an isolation tool, stored in a protective metal case for easy portability and organization. Great for artists on the go, it provides value without compromising on quality or precision. Shop Now
- Curved Tip Lash Tweezer Isolation W2: Engineered for advanced volume techniques, this curved tweezer boasts superior tension and tip alignment for quick, clean isolations. Its ergonomic shape reduces strain, making it a favorite for busy salons in warm climates. Shop Now
By investing in these top-rated isolation tweezers, you'll not only elevate your artistry but also enjoy tools that stand the test of time. Browse our full range to discover more options tailored to your style, and take the next step toward impeccable lash extensions.
Isolation Tweezers Guide: Key Takeaways

This guide covers the essentials of isolation tweezers for eyelash extensions, including their role in precise lash separation, benefits for beginners and pros, comparisons between curved and straight types, step-by-step usage, maintenance tips, and signs for replacement. Tailored for challenging climates like the UAE, it emphasizes durable materials, proper handling, and alternatives to ensure effective, long-lasting results. For a broader range of lash supplies, check out the Winlash homepage.
Frequently Asked Questions about Isolation Tweezers
What are isolation tweezers?
Isolation tweezers are specialized tools used in eyelash extension applications to separate individual natural lashes. They feature ultra-fine tips for precision and are essential for preventing clumping and ensuring proper adhesion of extensions.
What is the difference between curved and straight isolation tweezers?
Curved isolation tweezers have an angled tip that improves visibility and reduces hand strain, making them ideal for volume lashes. Straight tweezers offer direct control and stability, best suited for classic lash applications. Choose based on your technique and comfort.
What are the best isolation tweezers for beginners?
For beginners, straight isolation tweezers with medium tension are recommended as they provide stability and control while learning to isolate lashes. As you gain experience, experiment with curved options for more advanced techniques like volume fans.
How do you clean and disinfect isolation tweezers?
Clean by rinsing with warm soapy water, then soak the tips in 70% isopropyl alcohol for 10 minutes. For deeper disinfection, use barbicide or boil in water for 5-15 minutes. Always air-dry completely to prevent rust, especially in humid environments.
How do you hold isolation tweezers properly?
Use the tripod grip: place your thumb and index finger on the handles for control, with your middle finger supporting the base. This distributes pressure evenly and reduces fatigue during long sessions.
When should I replace my isolation tweezers?
Replace them every 6-12 months or sooner if you notice dulled tips, misalignment, loose tension, or rust. Regular use in humid conditions can accelerate wear, so inspect frequently to maintain precision.
What are the best isolation tweezers?
The best ones feature surgical-grade stainless steel, fine tips, and ergonomic grips. Popular picks include curved models for volume work and straight for classics. Check user reviews and opt for rust-resistant options in high-humidity areas like the UAE.
How do I prevent lashes from sticking to tweezers?
Keep tweezers clean of adhesive residue by dipping in tweezer cleaner or isopropyl alcohol. If sticking persists, lightly dust the tips with baby powder to reduce adhesion without affecting lash application.
How do I choose the right isolation tweezers?
Consider your lash style (classic or volume), material (stainless steel for durability), tip shape (curved or straight), and grip (non-slip for better control). Test for lightweight design and proper tension to minimize hand fatigue.
Should I sterilize or just disinfect my tweezers?
Disinfect after each client using alcohol or barbicide, and sterilize at the end of the day with a UV tool or hospital-grade solution to ensure hygiene and extend tool life.

